Embrace Sweet Serenity: The No-Bake Chocolate Cherry Ice Cream Tart
When the summer sun beats down and the mere thought of turning on your oven sends shivers down your spine, the quest for a cool, refreshing, yet undeniably impressive dessert begins. Enter the
Showstopper Chocolate Cherry Ice Cream Tart: No Oven Required – a true marvel that delivers on both elegance and ease. This isn't just any dessert; it's a celebration of summer's bounty, a symphony of rich chocolate and vibrant cherries, all wrapped up in a simple, no-fuss package. Forget complicated layers, endless baking, or hours of prep time. This
chocolate covered cherry ice cream tart is designed for the busiest among us, promising a showstopping finish with minimal effort, making it the ultimate summer treat.
We all crave those moments where we can present a dessert that looks like it took a professional pastry chef days to create, yet we secretly whipped it up in under an hour. This no-bake wonder fulfills that desire perfectly. It's an ideal choice for backyard barbecues, elegant dinner parties, or simply a delightful indulgence on a warm evening. The combination of a rich brownie crust, creamy chocolate cherry ice cream, and a decadent chocolate finish makes this tart an unforgettable experience for chocolate and cherry lovers alike.
The Magic of No-Bake: Why This Tart is Your Summer Savior
The genius of the
No-Bake Chocolate Cherry Ice Cream Tart lies in its utter simplicity and the complete liberation from oven heat. In the warmer months, our kitchens become sanctuaries from the sweltering heat, and adding a 350°F oven to the mix is often the last thing we want to do. This recipe elegantly sidesteps that problem, making it the quintessential summertime dessert.
Imagine creating an absolutely stunning dessert without breaking a sweat, literally. This tart requires no baking, no complex custards, and no intimidating tempering of chocolate. Instead, it relies on simple, accessible ingredients and clever techniques that allow you to assemble a dessert that looks sophisticated but is genuinely straightforward. It’s perfect for those spontaneous gatherings or when you just need a luxurious dessert without the associated stress. The "no-bake" philosophy extends beyond just avoiding the oven; it's about a dessert that comes together quickly, chills beautifully, and is ready to impress whenever you are. This convenience is what elevates it from a mere recipe to a true "summer savior" for anyone looking to create delightful culinary experiences without the fuss. For a similar stress-free experience, consider our
Quick & Easy Chocolate Cherry Ice Cream Tart for Busy Bakers.
Crafting the Perfect Foundation: The Brownie Crust
Every great tart needs an equally great foundation, and for our
chocolate covered cherry ice cream tart, that means a simple yet incredibly satisfying brownie crust. This isn't a crumbly cookie crust; it's a rich, fudgy base that perfectly complements the creamy ice cream filling. And the best part? It comes together in mere minutes, often requiring just a food processor and a few staple ingredients.
To achieve this delightful crust, you typically combine crushed brownie wafers, chocolate cookies, or even a pre-made brownie mix with melted butter and perhaps a touch of sugar or cocoa powder for extra depth. The mixture is then pressed firmly into your tart pan.
Here are some tips for a flawless crust:
- Choose Your Tart Pan Wisely: A tart pan with a removable bottom is your best friend here. It not only creates that beautifully fluted edge that adds to the tart's visual appeal but also makes unmolding an absolute breeze.
- The Plastic Wrap Trick: For any no-bake crust, especially one you want to present on a cake stand, lining your tart pan with plastic wrap before pressing in the crust mixture is a game-changer. Leave an overhang to act as "handles," allowing you to effortlessly lift the chilled tart from the pan.
- Press Firmly: Use the bottom of a flat glass or your fingers to firmly press the crust mixture evenly across the bottom and up the sides of the pan. This compaction is key to a stable crust that won't crumble when sliced.
- Chill Thoroughly: Once formed, the crust needs a good chill in the freezer. This allows the butter to solidify and bind the crumbs, creating a sturdy base for your ice cream.
The beauty of this brownie crust is its adaptability. While it’s perfect for our chocolate cherry creation, the concept is infinitely versatile. Imagine a blondie-style crust paired with caramel ice cream and fresh peaches, or a spiced cookie crust with pumpkin ice cream in the fall. The possibilities are endless, making this basic no-bake crust a valuable skill for any dessert enthusiast.
The Star of the Show: Indulgent Chocolate Cherry Ice Cream
While the crust provides the perfect stage, the true star of our
chocolate covered cherry ice cream tart is, undoubtedly, the rich and creamy chocolate cherry ice cream itself. This isn't just plain chocolate or plain cherry; it's a harmonious blend where the deep intensity of chocolate meets the bright, fruity burst of cherries, creating a flavor profile that is both comforting and exhilarating.
For homemade ice cream, the journey begins with a creamy base, often infused with cocoa powder or melted chocolate to achieve that decadent chocolate flavor. But what truly elevates this to a "chocolate cherry" experience are the cherries themselves. While you could use fresh, uncooked cherries, roasting them first is a game-changing step that transforms their flavor and texture.
Elevating Your Cherries: The Roasting Method
Roasting cherries might sound like an extra step, but it’s a simple process that yields incredible rewards. Roasting concentrates their natural sweetness, deepens their flavor, and causes them to release their vibrant juices, creating a more intense and complex cherry component for your ice cream. This also helps prevent the cherries from becoming icy hard nuggets when frozen, ensuring a smoother, more pleasant texture in your finished ice cream.
Here's how to roast cherries like a pro:
- Preheat Your Oven: Start by preheating your oven to a moderate 425°F (220°C).
- Prep Your Pan: Line a baking sheet with parchment paper. This prevents sticking and makes cleanup a breeze.
- Wash and Pit: Wash your fresh sweet cherries thoroughly, then pit them. A cherry pitter makes this quick, but a chopstick or small knife can also do the trick.
- Slice and Spread: Slice the pitted cherries in half and spread them in a single layer across your prepared baking pan. Avoid overcrowding the pan, as this can steam the cherries instead of roasting them.
- Roast: Roast for approximately 20 minutes, or until the cherries begin to soften and release their luscious juices.
- Sweeten and Chill: Remove the cherries from the oven and, while still warm, sprinkle them with a little sugar. This encourages them to release even more of their delicious juices, creating a syrupy reduction. Stir gently and then chill them completely before folding them into your chocolate ice cream base. This chilled mixture will be packed with concentrated cherry flavor, ready to make your homemade ice cream unforgettable.
Once your chocolate ice cream base is churned (or if using a high-quality store-bought chocolate ice cream), gently fold in your chilled roasted cherries. The result is a creamy, rich ice cream studded with bits of intensely flavorful cherries, forming the heart of your exquisite tart.
Assembling Your Masterpiece: Tips for Success
With your perfectly chilled brownie crust and your tantalizing chocolate cherry ice cream ready, the final assembly of your
chocolate covered cherry ice cream tart is the easiest and most rewarding step. This is where your individual flair can truly shine through in presentation.
Layering for Perfection:
- Scoop and Spread: Remove your chilled crust from the freezer. Working quickly, scoop your softened (but not melted) chocolate cherry ice cream into the crust. Use an offset spatula or the back of a spoon to gently spread the ice cream evenly, ensuring it fills the tart shell completely.
- Smooth the Top: For a polished look, aim for a smooth, even top surface. You can even create a slight domed effect if desired.
- Freeze Until Solid: This is perhaps the most crucial step. Once the ice cream is in the crust, return the tart to the freezer. Allow it to freeze for at least 4-6 hours, or preferably overnight, until it is completely firm. Patience here is key to clean slices and easy unmolding.
The "Chocolate Covered" Finish and Serving:
The "chocolate covered" aspect of this tart can be interpreted in several delightful ways, adding that extra layer of indulgence:
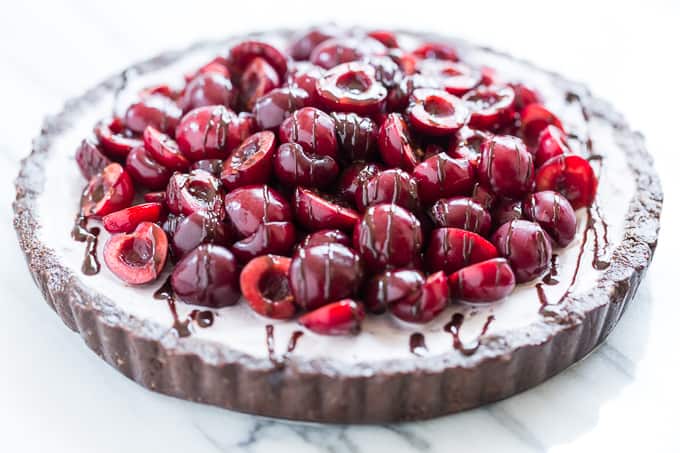
- Decadent Ganache Drizzle: A simple homemade chocolate ganache (equal parts hot cream and chopped chocolate, stirred until smooth) can be drizzled generously over the top of the frozen tart before serving. The cold tart will set the ganache quickly, creating a beautiful, glossy finish.
- Chocolate Shavings or Curls: A vegetable peeler can turn a block of good quality chocolate into delicate shavings or curls, scattered artfully over the tart.
- Chocolate Glaze: For a full "chocolate covered" effect, a thinner chocolate glaze can be poured over the entire tart, letting it drip down the sides for a dramatic look.
- Fresh Cherry Garnish: Always a welcome touch, a few fresh, glistening cherries arranged on top provide a vibrant contrast and a hint of what's inside.
When you're ready to serve, carefully remove the tart from the freezer. If you used the plastic wrap trick, gently lift the tart out of the pan. Place it on a beautiful cake stand for an elevated presentation. For easiest slicing, let the tart sit at room temperature for 5-10 minutes (no more!) to slightly soften the ice cream, allowing your knife to glide through cleanly.
This
chocolate covered cherry ice cream tart is infinitely adaptable. Feel free to experiment with different ice cream flavors, vary your crust (perhaps a chocolate wafer crust for extra crunch), or change up the fruit. But for a truly classic, crowd-pleasing summer dessert, the chocolate cherry combination reigns supreme.
Indulge in Effortless Elegance
The No-Bake Chocolate Cherry Ice Cream Tart is more than just a dessert; it's a testament to the fact that you don't need to spend hours in the kitchen to create something truly spectacular. With its rich brownie crust, vibrant roasted cherry-infused chocolate ice cream, and decadent chocolate finish, this
chocolate covered cherry ice cream tart is a feast for both the eyes and the palate. It's the ultimate easy summer treat that promises to impress your guests and satisfy your sweet tooth, all without ever turning on the oven. So, embrace the ease, savor the flavors, and enjoy the blissful simplicity of this magnificent no-bake creation.